SolarTuff Installation

SOLARTUFF VIDEO INSTALLATION GUIDE

SOLARTUFF GRECA

SOLARTUFF SOLID

SOLARTUFF CUSTOM GLAZE

INSTALLATION

This page provides the basic information on the installation of SolarTuff. Please read and follow the installation’s instruction carefully before starting. Warranty does not cover any damage caused to the product due to improper installation by customer.

01 GENERAL

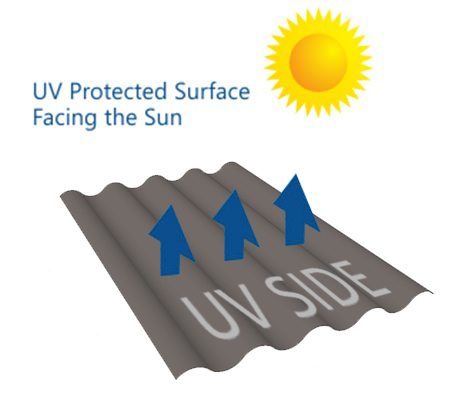
  • Always install SolarTuff® sheets with Ultra Violet (UV) protected surface facing the sun.
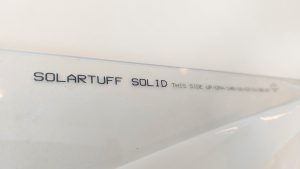
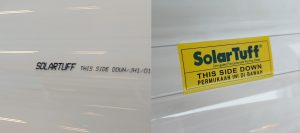
  • Ensure that the UV side is identified before installation. A sticker indicating this is provided on each sheet of SolarTuff®.
  • Remove the sticker only after installation. It is not possible to determine the UV protected side once the sticker is removed.
  • Use only rust proof fasteners with domed weather proof seals
solartuff inject print sticker permukaan menghadap bawah

CAUTION: misplacing the UV side will void the warranty of the sheet.

permukaan uv side pada solartuff

03 ROOF PITCH

Minimum 5º roof pitch or 88mm rise per lineal metre is required to ensure sufficient rain water run off.

kemiringan atap solartuff yang direkomendasikan

04 LENGTH OVERLAP

Allow 200mm overlap for low pitch roof, and 150mm for steeper one.

05 SIDE OVERLAP

profil alderon

06 OVERHANG

Overhang must not exceed 100mm, and should be maximum at 50mm in high wind areas.

07 FIXING SPACING

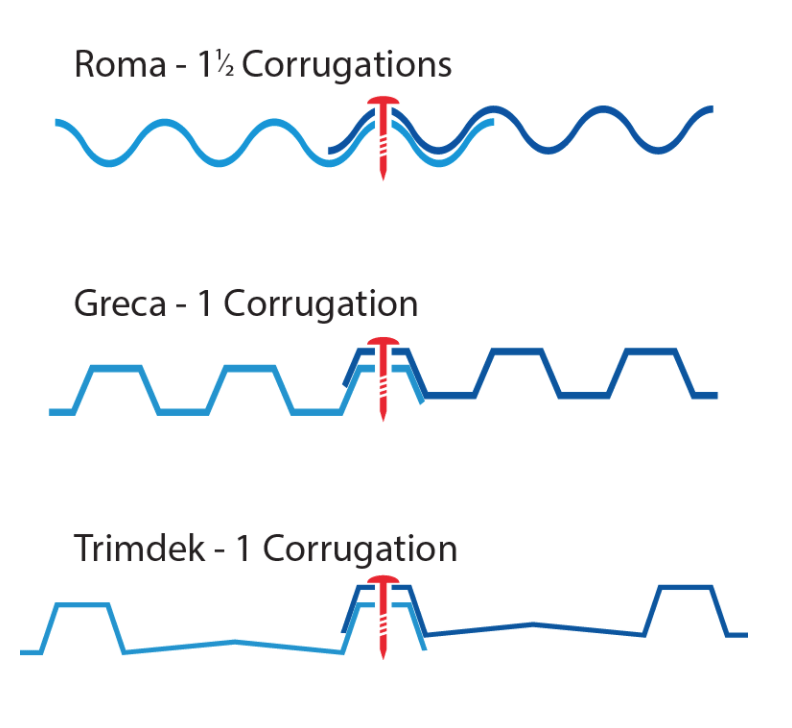
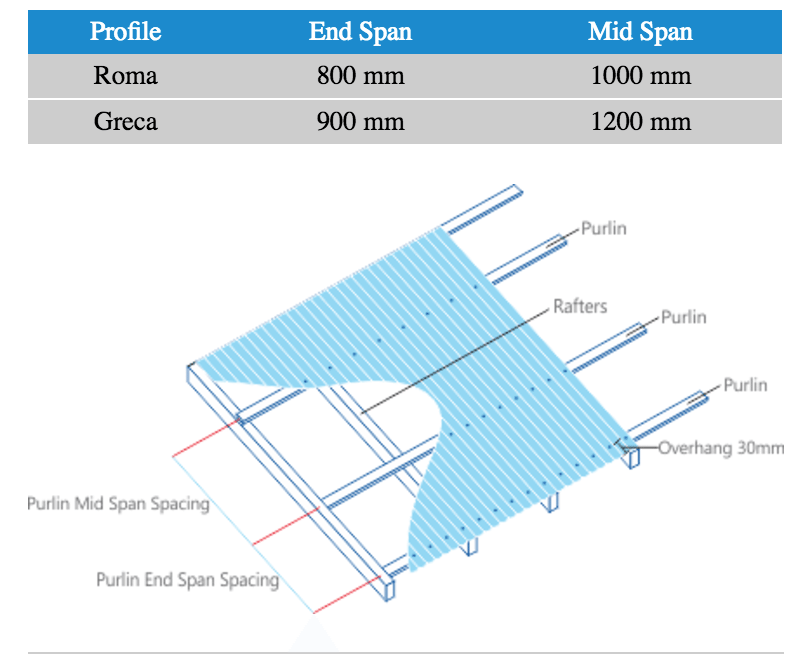
Fastening is best through the crest of the wave. Fix SolarTuff Roma and Greca on every second corrugation of each end purlins, and on each third corrugation of mid purlins.

08 MAXIMUM PURIN SPACING

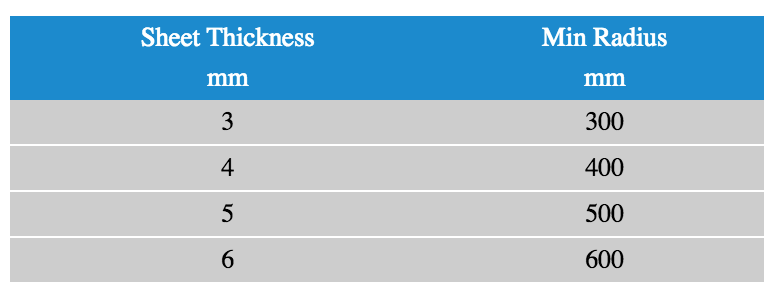
The following is the recommended the sheet’s radius of arched storage and installation.

ukuran polycarbonate polikarbonat

09 EAVE INFILL STRIP

Infill strip is recommended to be used on the end purlin to prevent water, wind, dust, insects entering from the eave.

01 GENERAL

  • Always install Solartuff Solid® sheets with Ultra Violet (UV) protected surface facing the sun.
  • Plain (non embossed) Solartuff Solid® Polycarbonate sheet is protected with a masking film on both sides, while embossed is at UV side only.
  • The masking should be left in place during fabrication and installation to protect the surface and removed only when all work is completed.
  • For the plain (non embossed), please ensure that the UV side is identified before installation. It is not possible to determine the UV protected side once the masking is removed.
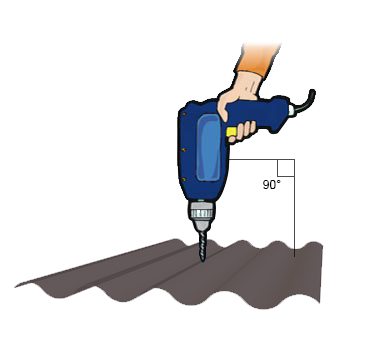
  • Pre-drilled the holes at the range of 3-5mm from the diameter of fasteners to allow thermal expansion during noon time and contraction during night time.
  • For roofing application, minimum 5º slope is recommended to allow water flows.
  • Use only rust proof fasteners with domed weather proof seals.
solartuff solid solarflat inject print sticker permukaan menghadap atas

CAUTION: misplacing the UV side will void the warranty of the sheet.

02 SAWING

  • Solartuff Solid® Polycarbonate sheet can be cut using saws, handsaws or jigsaws. The sheet should be clamped to a support before cutting to avoid vibration and chattering. Commence cutting with saw blade in motion, use low speed on power tools for controlled cutting and so that the material does not overheat and melt.

    Leave the masking on to prevent scratching. Always wear protective goggles when cutting the sheet.

    Use triple chip circular saw blades with carbide teeth. Band saws should have 5 teeth/cm and should be used to trim the sheet or to cut irregular shapes.

03 FLAT  GLAZING INSTALLATION

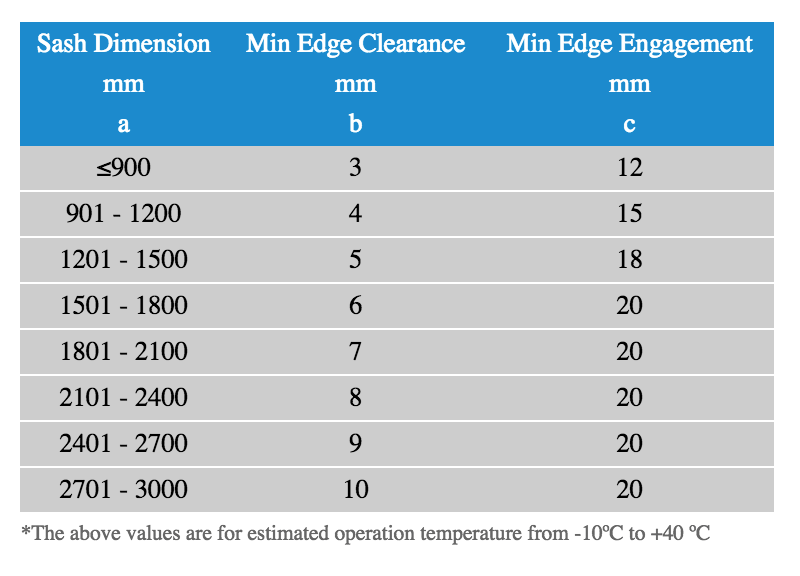
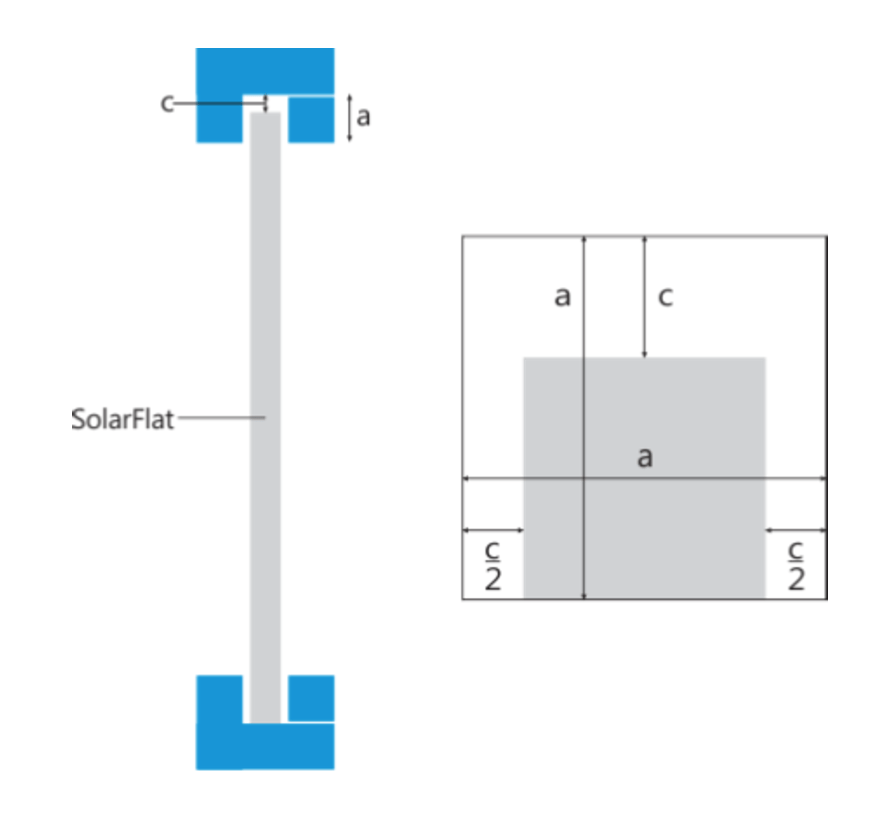
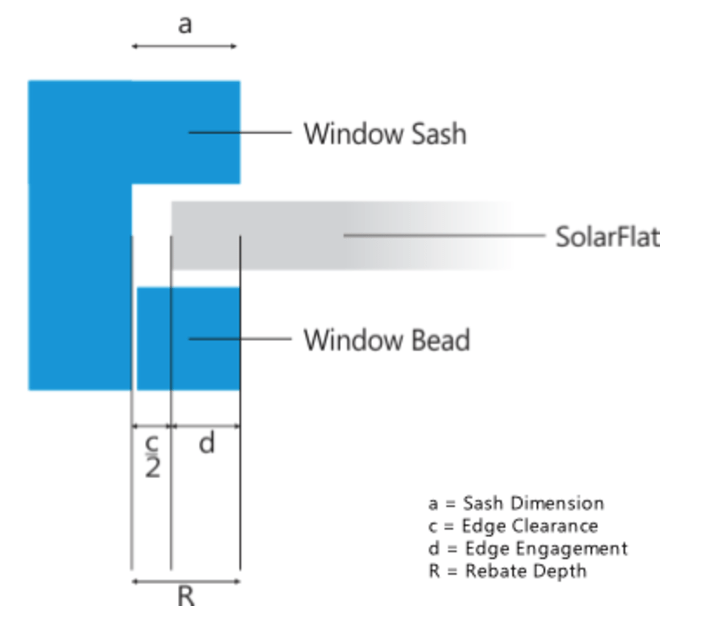
  • Similar to the glass, Solartuff Solid® can be installed in any type of frames, steel, aluminum, wood, etc.When installing Solartuff Solid® in a frame, please ensure to allow space for thermal expansion to prevent the sheet from bowing.
pemasangan polycarbonate

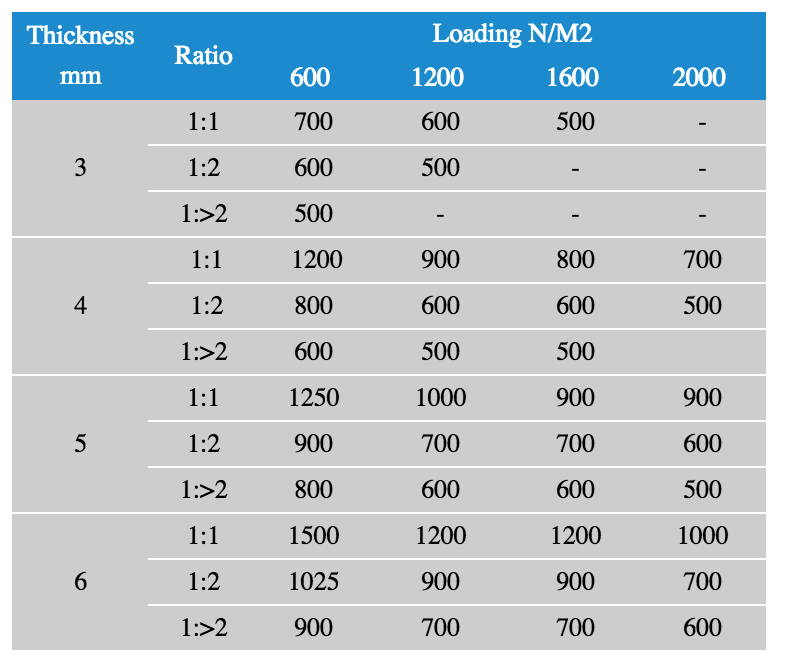
04 MAX SPAN RECOMMENDATION FOR GLAZING INSTALLATION

  • Sealing the open-ended channels is very important since moisture build-up and dust contamination inside the channels can be a major problem.
    • Seal the top end channels with an impermeable
      tape, while bottom end channels sealed with a
      perforated filter tape.
    • Additional `U’ profile covering perforated bottom
      tape
    • Care should be taken to provide a clearance between
      both sheet edges and sash platform to allow for
      condensation drainage.

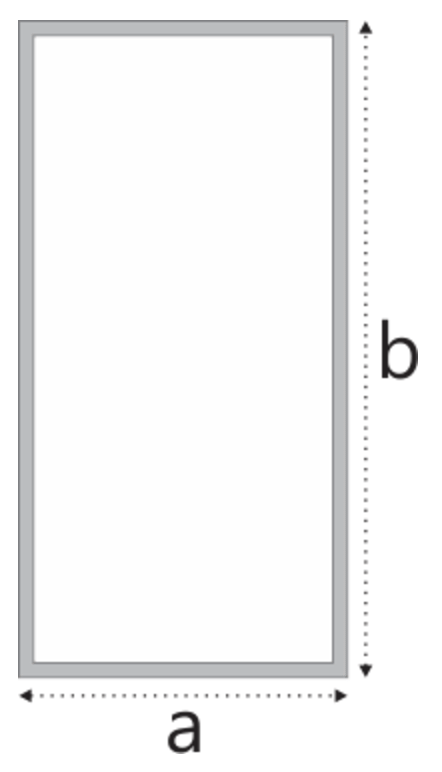
05 FOUR SLIDES CLAMPED

ukuran atap fiber transparan

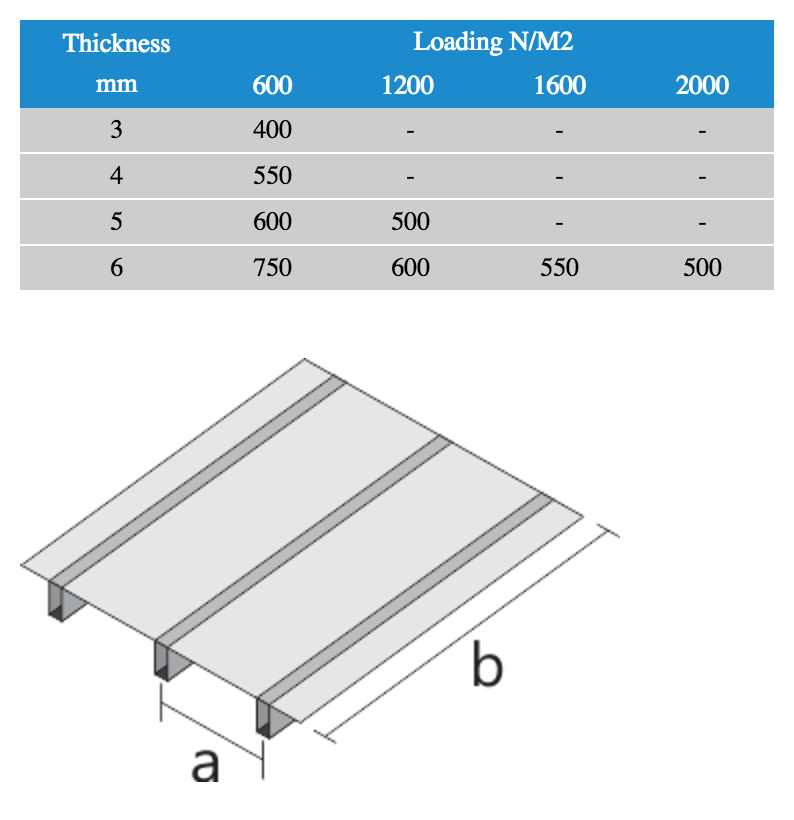
06 TWO SLIDES CLAMPED

ukuran standar polycarbonate

07 MIN RADIUS RECOMMENDATION FOR CURVED INSTALLATION

  • Solartuff Solid® can be cold bent or thermoformed for curved glazing application. The recommended minimum radius for cold bending is 100 X the thickness of the sheet. Exceeding this recommendation will add undue stress to the sheet.

cara pasang solarflat solartuff solid - rekomendasi minimum radius

08 CLEANING

Polycarbonate is not a mar resistant material (Rockwell ASTM – D790 M70) and care must be taken not to scratch the surface. Always clean the sheet by washing with warm soap and water using a soft cloth or sponge. Rinse well with cold water.

CAUTION: Do not use abrasive solvents and cleaners. Refer to the Chemical Resistance Chart for recommendations.

01 DERAJAT KEMIRINGAN

Derajat kemiringan atap minimal 5°, agar air hujan dapat turun seluruhnya.

derajat kemiringan solartuff custom glaze

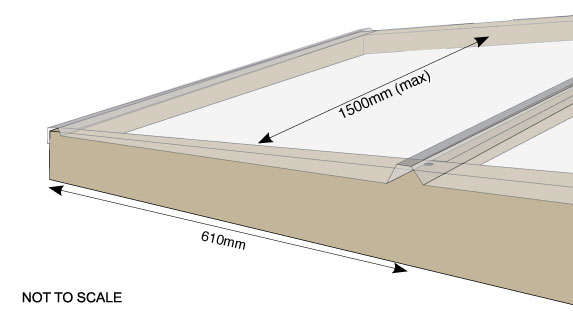
02 JARAK RANGKA

Rangka vertikal : 610 mm

Overhang : 100 mm

Rangka horizontal :
1,500 mm (area bertekanan angin rendah)
600 mm (area bertekanan angin tinggi)

pemasangan solartuff custom glaze

03 PEREDAM BISING

Area dengan tekanan angin tinggi dapat menyebabkan bising pada lembaran produk. Gunakan plaster peredam bising berwarna putih.

04 PEMASANGAN SEKRUP

Produk berekspansi di bawah panas matahari. Berikan ruang ekspansi dengan melakukan bor pendahuluan pada produk menggunakan mata bor berdiameter 2-3 mm lebih besar dari diameter batang sekrup. Pasang sekrup dengan obeng elektrik. Jangan memasang sekrup miring atau melesak. Gunakan sekrup berkepala datar dengan karet EPDM.

cara pasang sekrup solartuff custom glaze
cara pasang penyambungan kanopi solartuff custom glaze

05 PENYAMBUNGAN SAMPING

Puncak atas Custom Glaze lebih lebar dan lebih tinggi daripada puncak bawah, juga ditandai dengan cetakan tinta bertuliskan : “CG610/OVERLAPPING CREST”. Puncak atas diinstall di atas puncak bawah pada penyambungan samping.

Berikut cara pemasangannya:

  • Selesaikan semua pekerjaan konstruksi lainnya sehingga lembaran produk bisa terpasang tanpa debu atau kotoran lain berterbangan yang dapat menyebabkan goresan pada produk.
  • Lepaskan film pelindung bagian belakang.
  • Letakkan lembar produk pertama (lembar 1) hingga puncak atasnya berada di titik tengah rangka vertikal. Pasang sekrup hanya di puncak atas, sepanjang rangka vertikal dengan jarak satu sekrup ke sekrup lainnya sebesar 500 mm.
  • Letakkan lembar produk ketiga (lembar 3) di rangka vertikal ke-4. lalu pasang sekrup hanya di puncak bawah.
  • Masukkan lembar produk kedua (lembar 2) di tengah-tengah antara lembar 1 dan lembar 3. Posisikan puncak atas lembar 2 berada di atas puncak bawah lembar 1. Juga puncak bawah lembar 2 berada di bawah puncak atas lembar 3. Lalu pasang sekrup.
  • Lanjutkan pemasangan untuk 3 lembar produk berikutnya hingga seluruh rangka tertutup. Dengan cara ini, akan menjaga kestabilan bagian datar dari produk dan posisi puncak atas lebih akurat.
  • Lepaskan film pelindung bagian depan jika instalasi produk telah selesai.

ANY FURTHER QUESTIONS?

For further information on our products, please simply fill in the form below and our representative will respond to you as soon as possible.

OUR PREMIUM PRODUCTS